Sunday, December 23, 2012

Wrap it up - washi style

I love wrapping presents .  It's one of my favorite holiday activities.  It's actually even possible that I dream of someday working at the gift wrapping center in a department store (sigh).

I have a definite process that I go about in wrapping my gifts (more on that here).  The paper must always meet on an edge - none of this tape down the middle business.  Every crease has to be perfect.  And watch out if I have paper with lines - I will spend the extra time making sure that the lines are perfectly straight and all line up.  I might have a slight problem :-)

I always do something a little different with my gifts each year.  Last year it was yarn pom poms in lieu of bows.  This year it was washi tape and embroidery thread.  My friend Karisse and I got some cute Christmas washi tape at Michaels for wrapping - cause we looooove it and we neeeeeded it :-)

Washi tape is pretty paper tape  - think masking tape, only CUTE :-)

Here is a pic of my wrapped presents:


See the cute red tape with deers and herringbone.  That's washi tape.  I love how it gave me so many options for placement.  A great thing about washi tape is it can also be easily removed and replaced.  

If you are wondering about the gift tags, they are made out of clay.  Yes, I roll out clay, bake it, and decorate it.  Crazy me can't just slap a sticker on a present.  Nope, I have to spend an hour creating gift tags.  That's just how I roll :-)

This year for my gift tags, I gathered inspiration from Anthropologie - of course :-)

The fact that I have to ship my presents home means that I need to do simple wrapping - no big pretty bows that will get smooshed in a box.  So the washi tape works well.  

If you want to find your own washi tape, there are many options on Etsy.  I love the birds on a wire tape below:
Source: etsy.com via Melany on Pinterest

Now all my presents are wrapped and at their destinations far away.  I was sitting here earlier feeling sad about not having anything else to wrap.  I might start searching for empty boxes.  See, if I had a job wrapping presents at a big department store this would not be a problem :-)

Sunday, December 9, 2012

DIY - Mason jar snow globe


I love mason jars.  They are just so functional.  
There is their primary function - canning (which is something I want to try).  
You can use them to store food (I love the way they look in my pantry).  
You can drink out of them (a friend of mine got me the cutest mason jar mug for Christmas).  
There is also a world of crafting possibility offered by the little mason jar.  This past week I made a mason jar snow globe.  I love it!!!

This is an Anthropologie inspired craft - because Anthropologie is amazing.  It's my inspiration place.

I did not want to spend money on one of these when I knew I could make one.  This is a super easy craft and does not take a lot of time.

Here's what you need (all my supplies were bought at Michaels):


Mason jar:  Mine was about $2
Glue gun:  This was given to me by a friend
Itty bitty Christmas tree:  These can be found with the accessories for Christmas Village figures.  My tree was about $7, but I had a 40% off coupon.  I rarely buy anything full price at Michaels.
Fake snow:  This was also found in the Christmas Village section.  It was $3.50.

A word about the fake snow:  This stuff is messy.  I think there are other fake snow products (I have even seen some at Target) that are not as messy.  However, I have to say that I do recommend the one that I used (picture below).  It is almost like shredded styrofoam.  You probably can't tell by the pictures, but it has a slight sheen to it like real snow.  I also like the way that it sticks to the side of the mason jar.  So, the mess is definitely worth it.


I tested my tree to make sure it would fit in the jar before I pulled out the glue gun.  I realized that I wanted my tree to be a little bit taller to provide more room for snow.  So I began searching for things to put a little height to my tree.  I tried a tea light candle, but that was too tall.  Then I realized that I had a cardboard box in my closet so I pulled it out and cut out some circles.


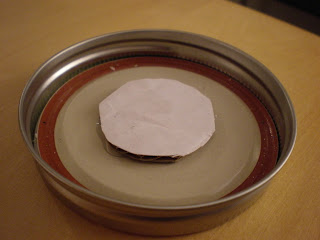
Two cardboard circles made the tree to tall, so I just glued one to the lid of the mason jar:


Then I glued the tree to the cardboard circle:


I forgot to take a picture of the next step - sorry.  I poured snow into the mason jar.  Then (after making sure the glue is dry), I turned the lid with the tree upside down and screwed the lid onto the jar.  

After assembling the snow globe, just turn it up right and shake the snow into place.  You might also need to tap the side of the jar to sift things into place.  If you find that you need more or less snow, you can take the lid back off and adjust the snow.  (Note: if you need to take the lid off, do it over a trash can.  Like I said, the snow is messy)

And there you have it.  One super fabulous - I made it myself - little piece of handmade Anthro inspired goodness - mason jar snow globe.


I love mine so much that I had to take it to work so I can enjoy it all day long.  I put it with "Anthro the seal" a little desk mascot that I bought at Anthropologie a few weeks ago.  You can get your own here. I love her and I am sure that she feels more at home now that she has a snow covered tree nearby :-)


Related Posts Plugin for WordPress, Blogger...